Making an Animated Holiday Card in Axure RP
The holidays are a wonderful time of year, full of friends, family, food… and prototyping? This year we're wishing you happy holidays with a snowflake holiday card made in Axure RP. We hope you've had a terrific year and that you have a great start to 2020! Continue reading if you'd like to see how we made the endlessly falling snow animation for Axure's 2019 holiday card. Download the RP file to follow along
Tip: With all those snowflakes falling — 17, to be exact — it's a bit tough to see what's going on. Open the page named One Snowflake to see the animation play out on a single snowflake.
Each snowflake follows a loop that keeps it falling, rotating, and fading — forever! When a snowflake resets, it gets resized based on a randomly generated value. Further, the rate at which a snowflake falls and rotates is based on its size, so the larger ones move faster than the smaller ones, creating an illusion of depth. Let's take a closer look at each step of this interaction loop. Open the Snowflake master and select the repeater to get started.
1. Setting the Snowflake's Size
[su_row]su_column size="1/2" center="no" class=""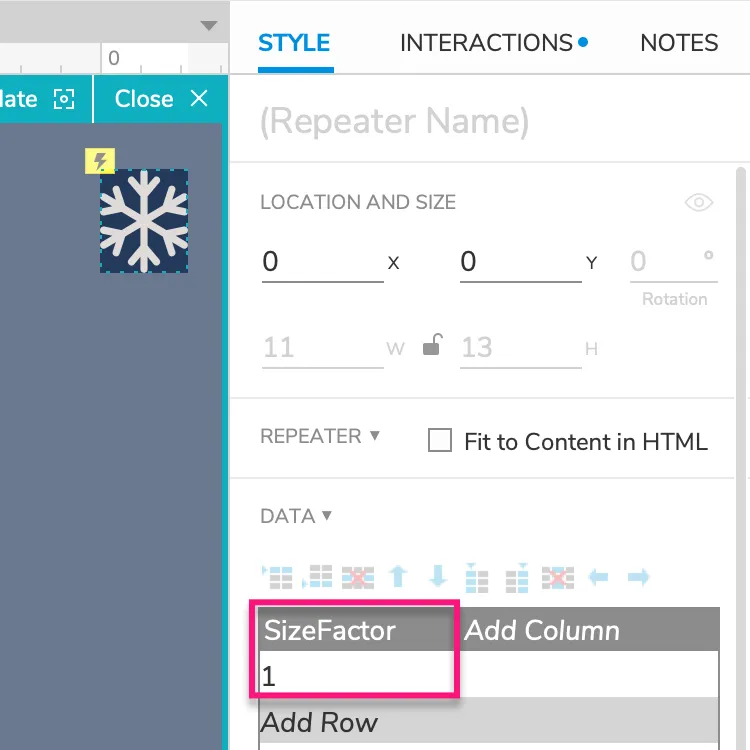 [/su_column]su_column size="1/2" center="no" class=""
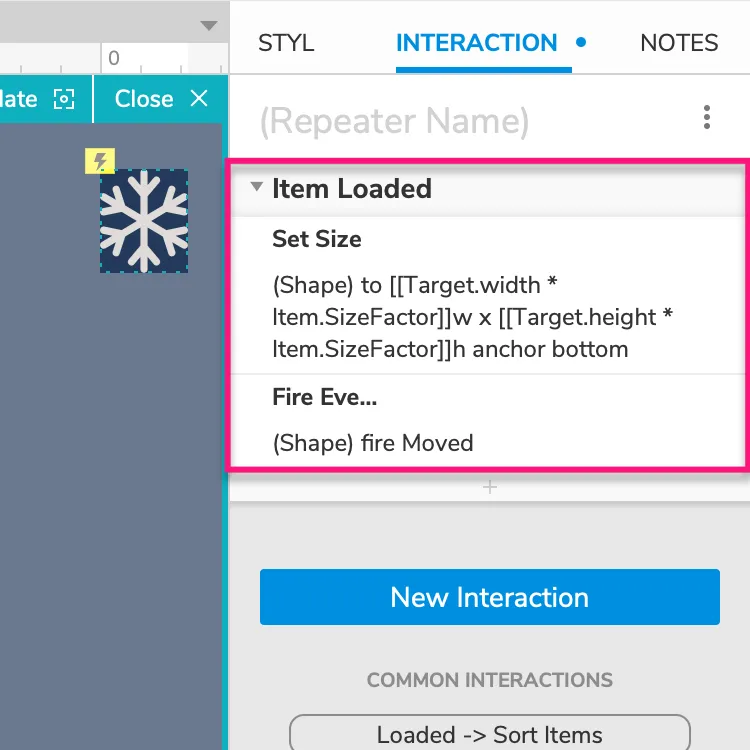 /su_column /su_row
The repeater in the Snowflake master has a single row, which creates a single snowflake. The repeater's Item Loaded interaction starts with a Set Size action that multiplies the snowflake's starting size by the value in the repeater's SizeFactor column. (This value is set to 1 by default, but it gets randomized to a value between 1 and 10 in Step 3.) The following equations are used to set the snowflake's width and height:
Width: [[Target.width * Item.SizeFactor]]Height: [[Target.height * Item.SizeFactor]]
Note: Target refers to the snowflake since it is the target of the Set Size action.
The Item Loaded interaction ends by firing the snowflake's Moved event to kick off its falling and rotating loop.
2. Moving and Rotating the Snowflake
[su_row]su_column size="1/2" center="no" class=""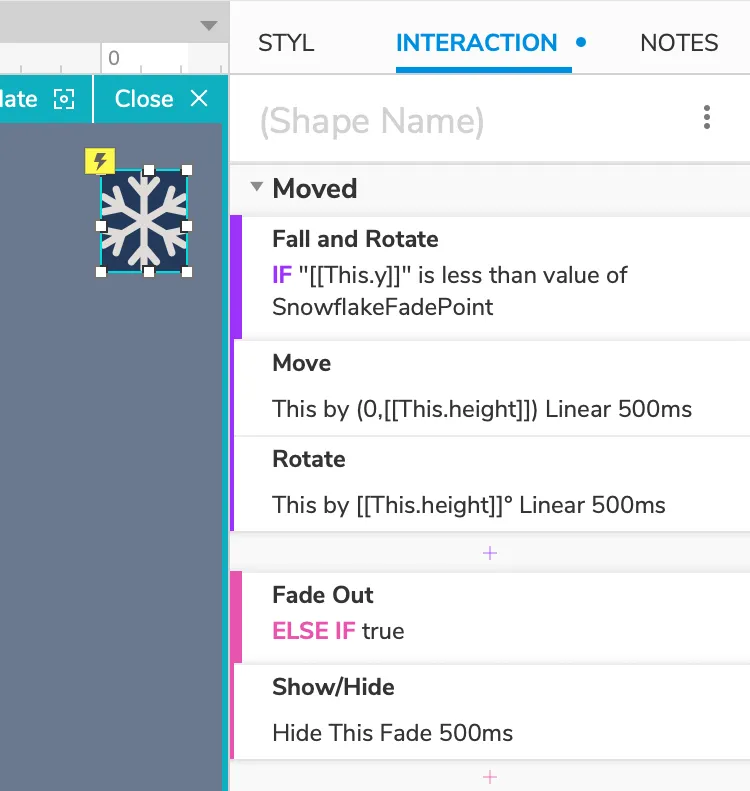 [/su_column]su_column size="1/2" center="no" class="" The snowflake's Moved interaction has two cases that use conditional logic to determine what happens when the snowflake is moved. /su_column /su_row
- The first case, Fall and Rotate, keeps the snowflake moving down the page as long as it's above the Y value stored in the SnowflakeFadePoint variable. (The variable value is set to 75% of the browser window's height with the Happy Holiday page's Window Resized interaction.) Notice that the Move and Rotate actions use
[[This.height]]in their values. This is how I got the snowflakes to fall and rotate faster or slower based on their size. The bigger the snowflake is, the faster it goes. - Once the snowflake falls below the SnowflakeFadePoint value, the Fade Out case hides it with a fade animation, which triggers its Hidden interaction.
3. Resetting the Snowflake

The snowflake's Hidden interaction starts out with a Wait action of 500ms, allowing enough time for the fading animation to be completed. It then deletes This repeater row, which deletes the snowflake. Finally, it adds a new row to the repeater, which creates a new snowflake. This is where the SizeFactor value from Step 1 gets randomized. The new repeater row is added with the following equation in the SizeFactor column:
[[Math.floor(Math.random() * SnowflakeMaxSizeFactor) + 1]]
This generates a random number between 1 and the value stored in the SnowflakeMaxSizeFactor variable, which is set to 10. (You can change this value by going to Project → Global Variables in the application menu.) Once the new row is added to the repeater, the loop starts over back at Step 1.
There's a lot more happening on the Happy Holidays page to create the snowfall that you see, of course. This interaction loop is just the basic building block. Check out that page's widget setup, its Page Loaded interaction, and its Window Resized interaction to see how everything else works.