5 Tips for Learning how to Use Axure RP Like a Pro

Whether you're a beginner Axure RP user who's opening the app for the first time, or a seasoned pro who would like a refresher, we'd like to share with you 5 essential tips that every Axure RP user should know:
Tip 1: Resizing Constraints
You can apply resizing constraints to widgets in groups (or to groups contained within a parent group) in the Style pane in order to lock a widget's distance from an edge of a group, or the vertical or horizontal center of the group. Then, whenever a group is resized, any widgets or nested groups with constraints applied to them will always maintain their absolute distance from the pinned edge, or from the vertical or horizontal center, depending on which options you have enabled.
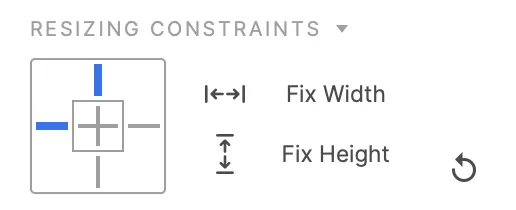
You can also lock the widget's width or height whenever a group is resized by selecting the Fix Width or Fix Height icons. Constraints can also be imported from assets that are copied and pasted into Axure RP via the Sketch, Figma, and Adobe XD plugins.
Tip 2: Global Variables
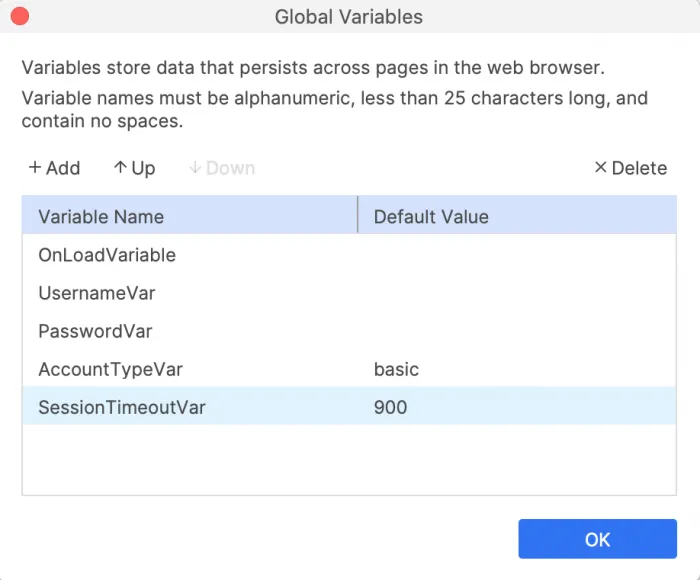
Looking to transfer values (such as numbers or text) across pages? If so, then global variables are your friend! Global variables and their values are accessible from every page in a project, so you can use them to pass information between pages. Go to Project → Global Variables to create and manage your project's global variables.
Tip 3: Adaptive Views
When prototyping for multiple device sizes, utilize adaptive views to save time and prevent you from needing to design from scratch for each device size. Adaptive views are alternate versions of pages designed for specific screen sizes. They allow you to create a page once and then rearrange, resize, and restyle its widgets to fit each screen size you intend to test it on. When you view the page in a web browser, the appropriate view for the browser dimensions will be shown automatically.
Tip 4: Components
If you have design elements that you'll be using on multiple pages in your project, such as headers, footers, and navigation bars, then be sure to keep components in your back pocket. Components are collections of widgets that you can maintain in a central location and reuse throughout a project. Additionally, anytime you make changes to the main component, they'll automatically be pushed out to every individual instance of the component in the project.

Tip 5: Keyboard Shortcuts
To speed up your workflow when creating and editing your prototypes, keyboard shortcuts are a great tool to utilize. Whether you're navigating through dynamic panel states, multi-selecting or deep-selecting widgets in a group, slicing and cropping images, or anything in between, keyboard shortcuts can help you along the way. Check out our full list of keyboard shortcuts!
For more Tips and Tricks subscribe to our newsletter or visit our documentation site at docs.axure.com. Also, if you have tips of your own that you'd like to share, email us at PR@axure.com.
Happy prototyping!